We value your privacy
This website uses cookies to ensure you get the best experience on our website.
 Skip to main content
This website uses cookies to ensure you get the best experience on our website.


Hacking Web Design with Neuroscience: 5 Ways to Change the Way Users See Your Site
Today’s web and mobile users are distracted because they’re bombarded with way more information online than they could ever consume. This has created a large (and growing) gap between the content available online and our capacity to consume it.
To give you an idea of just how extreme this problem is, there are 1.25 billion websites in the world, with new ones coming online every second.
 |
A search for “car insurance” on Google returns over 30 million results, while “running shoes” returns 41 million options. There are 9 million results for “concert tickets”.
Users react to this information overload the only way they can: by ignoring most of it. 75% of people never go beyond page 1 of Google’s search results, and when they do land on a site, they’ll completely ignore about 80% of the content they’re presented with, and will bounce nearly half of the time.
It’s very challenging to win and retain user attention, and you only get seconds to make an impression – so you need to make it count.
Most marketers and designers don’t take this seriously enough yet, so those who do gain an unfair advantage. The fact that you are reading this guide makes it likely for you to be part of the latter group 🙂
In this guide, we’ll help you understand a little bit more about how visual attention works, and how you can use visual characteristics in design to make sure you get your message across with your website.
This is a longer post, so here’s the roadmap in case you want to jump ahead:
For most designs you publish – be it a landing or product page, a generic website or an app, the basic exchange is this: your users spend attention as a currency to receive something of value in return. In the case of landing pages and eCommerce, that something is usually your product – that’s why they are on your site. Yet, more often than not, user attention ends up in all the wrong spots, and everybody loses: your visitor will be frustrated, and your company will lose out on engagement, conversions and revenue.
The Attention Budget is a useful concept for your design process to help you avoid this. The key point of it is that you need to have a crystal clear idea on which elements users need to see right away on your designs, and because their attention is limited, you only get to choose a small number. Having seen thousands of design optimization projects, we recommend that number to be three.
To get you started, we’ve developed the 3Ws framework, which forces you to focus on what matters the most on any design that’s designed to sell. As a rule of thumb, the 3 Ws should always be visible within 3 seconds (roughly 10 eye movements).
The 3 Ws are the pieces of content that explain:
| What (relevance)  |
Why? (value proposition)  |
Where next? (call to action)  |
While this sounds simple enough, you will find that many (if not most) websites fail to spend their attention budget on those targets! Sometimes they aren’t present on the page at all, and other times they’re competing for attention with other elements that aren’t targets. We call those “other” elements distractors.
In this guide, we’ll look at several attention hacks that leverage our understanding of the human visual system. This isn’t a textbook, so we’ll try and keep things practical.
Here at EyeQuant, we use machine learning to analyze fixation data from eye tracking studies and determine which design characteristics contribute most to visual saliency, which is the term used in neuroscience to describe how much something “stands out” within a visual scene. The most salient objects in a scene drive eye-movements involuntarily – people can’t help but look.
Each of the tactics we discuss here are proven and rooted in the science of how the human visual system processes information. While a few of them might seem obvious, there are very few websites that properly leverage these techniques. In fact, 70% of eCommerce shops fail to immediately convey their 3 Ws. Learning to use the following attention hacks will mean you can scientifically optimize your designs and know where people will look.
We’ve already discussed how to identify target content vs. distractors. Now that we’ve established that attention is a budget, the obvious first step to ensure that target content gets seen is to remove or hide content that we’ve identified as a distractor. Most websites are too cluttered, so there’s a very good chance that you can get more eyeballs on your important content by removing something that’s less important. To do this, follow our Simple 3-Step Process for Decluttering your Website, which includes tips for:
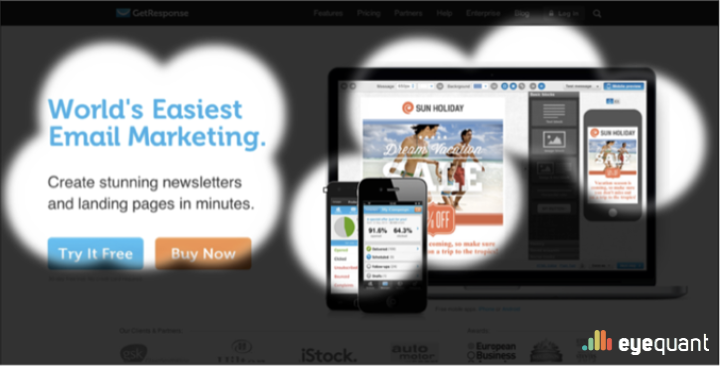
Here’s a quick example of a design that contains several distractors:
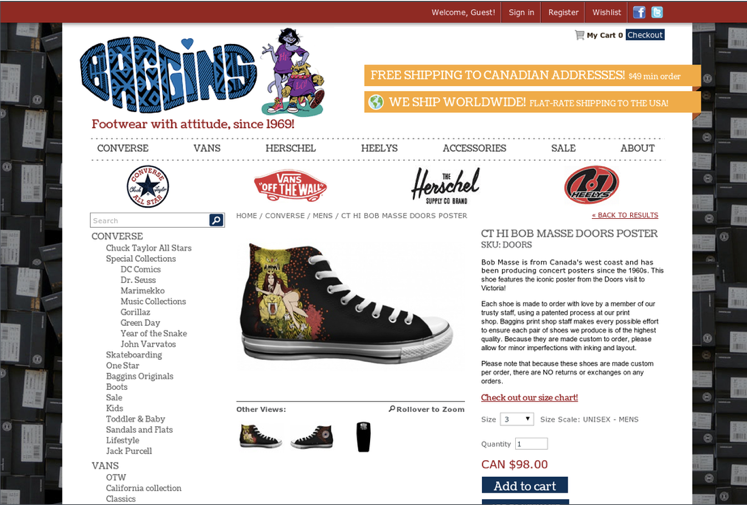
There’s a lot going on here, and not all of it is necessary. We analyzed this design with the EyeQuant Perception Map to see if users would see the 3 Ws immediately or not. in this case, the key messaging is contained in the title & product description, the image, and the call to action.
But our test showed that users are likely to miss the description when they first arrive on the page:
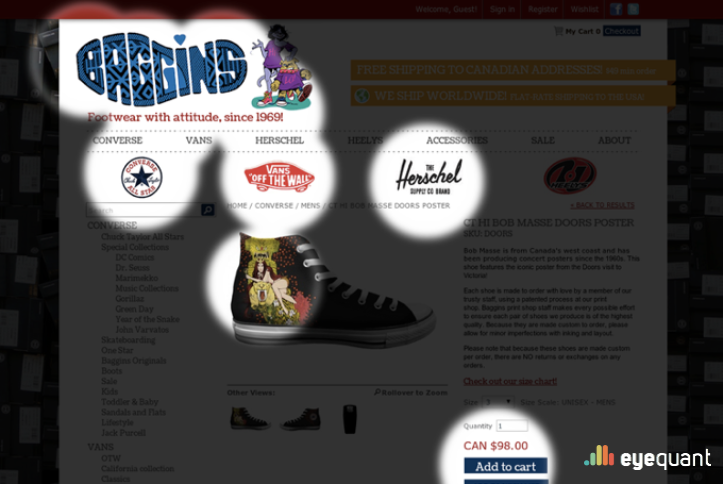
The perception map simulates which content will be in direct sight (also called the foveal view) within the the first 3 seconds of their visit (roughly 10 eye movements).
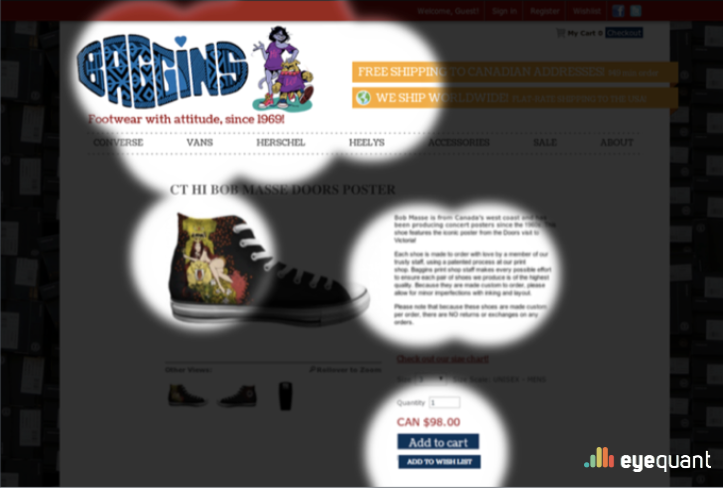
Here’s how the same map looks once some distractors are removed:
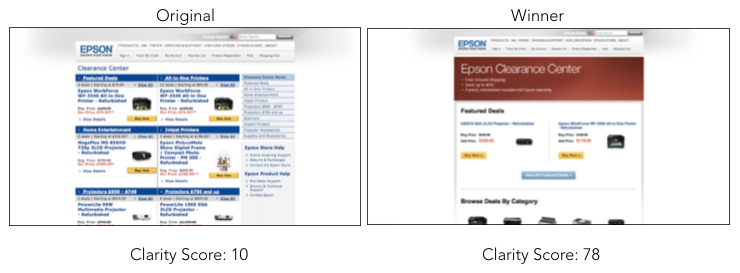
To show just how powerful de-cluttering can be, we’ve prepared several de-cluttering case studies, including this one from Epson that led to a 20%+ increase in conversion rates.
Luminance refers to the intensity or perceived “brightness” of a light, or in this case, the brightness of a color used on your website. The idea that bright colors attract attention isn’t new, but here’s the thing: our data suggests it’s the contrast in brightness that really matters – particularly when it comes to text and background colors. For example, if your website has a light background, then you should use darker colors to accentuate your most important content (and vice versa). Here’s an example using CTA buttons from The Truth About Button Color on Websites:

Notice how Option #1 is by far the most eye-catching? It’s because it has a much higher luminance contrast ratio. This simple ratio is so important that NASA actually has guidelines for it in their design manual for cockpit graphics.
Abercrombie & Fitch’s product detail pages are a great example of how to use luminance contrast effectively:
Abercrombie & Fitch design/a&f.png) |
Content seen in first 3 seconds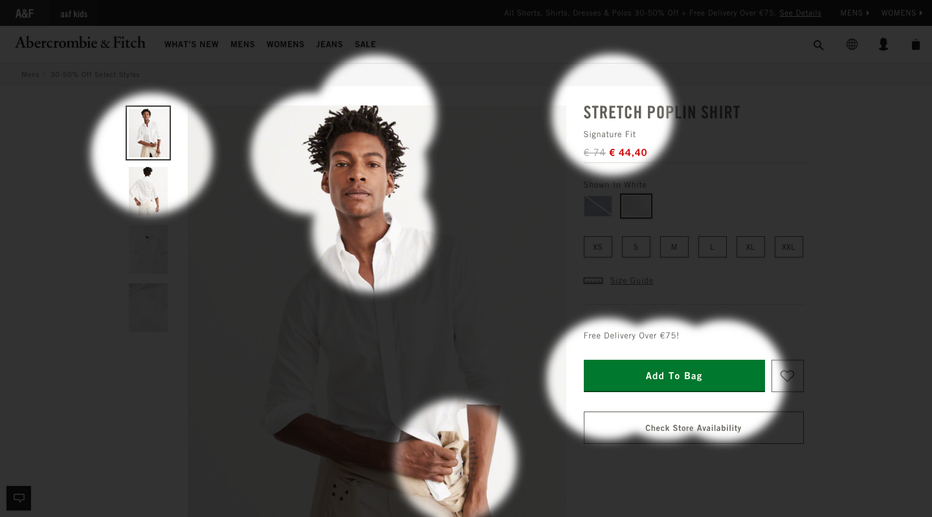 |
The green button used on this product page is loaded with luminance contrast, and it works. According to the EyeQuant perception map, users look directly at the button within 3 seconds of landing on the page.
Many websites get this wrong. For example, here’s the homepage of CommBank, one of Australia’s largest financial institutions. Their website is generally very good, but notice how they’ve used yellow to try and highlight the key words in the headline:
CommBank design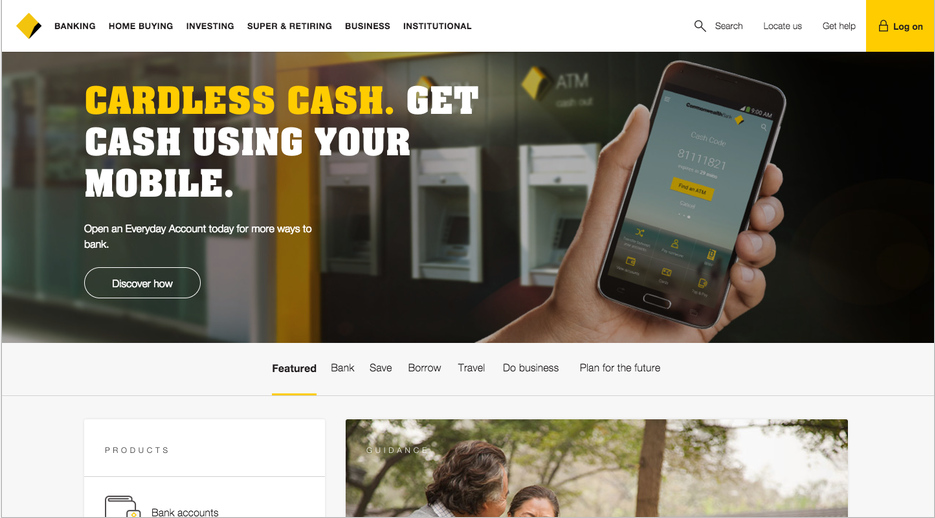 |
First 3-seconds Heat Map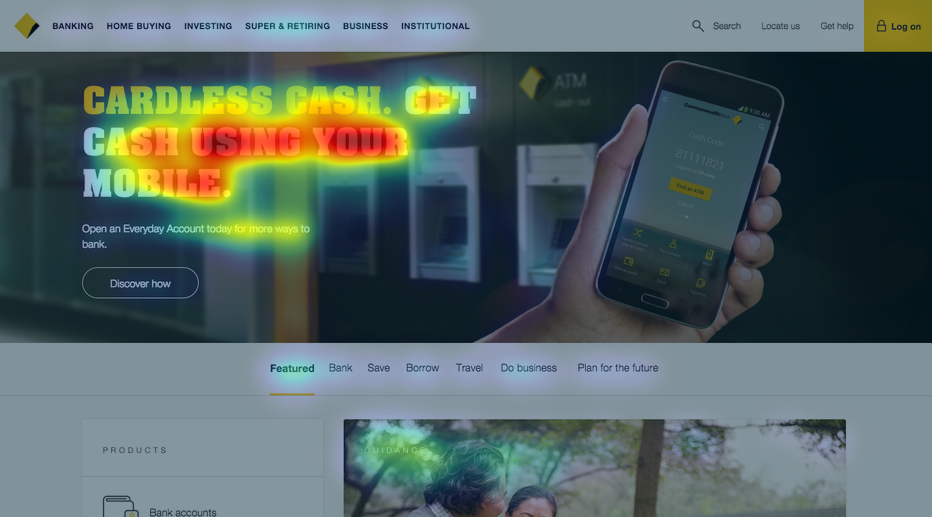 |
Unfortunately, this doesn’t work at all because the white text actually stands out more than the yellow because it’s got a higher luminance contrast. This is confirmed by the EyeQuant Attention Map for the the page, which predicts where users are most likely to look when they first land on the page.
In the same way that luminance contrast helps to draw the eyes towards key content, it can also be used to make it clear that secondary or supporting content is just that – secondary. You can do this by simply reducing the luminance contrast of that content, i.e. the primary content and the background color should be closer in lightness (but still legible). A simple example of this would be using gray text (on a light background) instead of black.
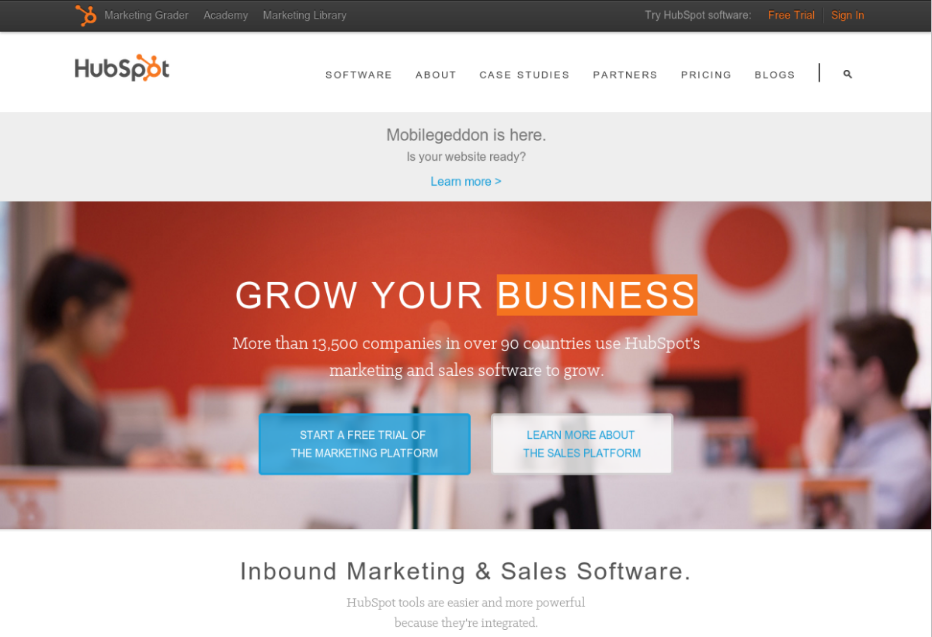
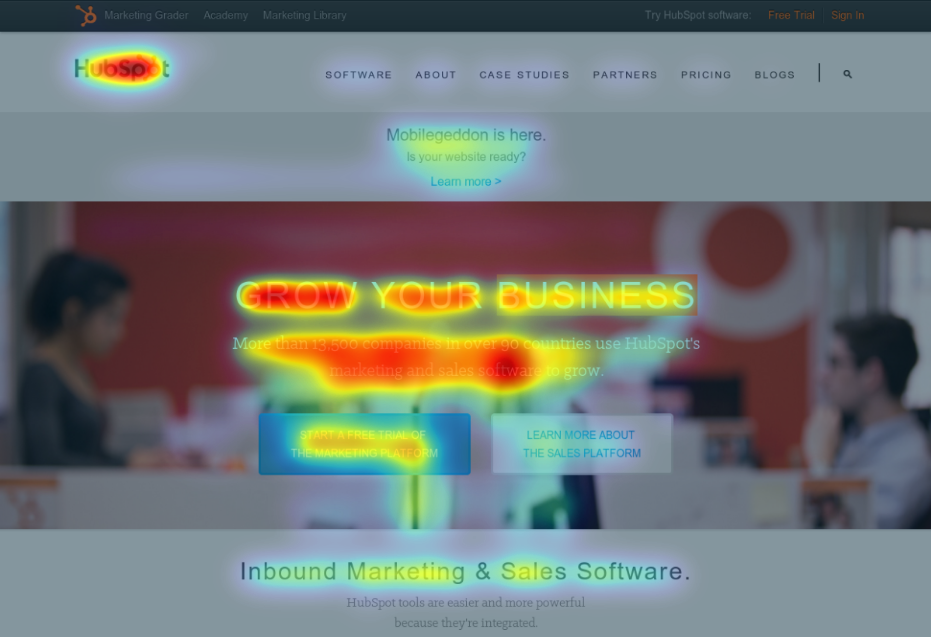
This landing page design from Hubspot is a great example. Notice how the text below the banner is gray so as to avoid having it compete with the main messaging of the page:
|
HubSpot Design: |
First 3-Seconds Heat Map |
If they had used black, it might have taken attention away from their call to action or primary value proposition. These shade considerations might seem small, but they can make a big difference for users first impression of your design.
The color combination with the highest luminance contrast is black and white. So if your website has a white background, does that mean you should always use black to emphasize key content? Not quite. This is where another effect comes into play, which is often called the “pop out effect”.
Here’s an example of the pop out effect:
/popout_12.gif)
In the image above (courtesy of NASA), you probably noticed the red and pink letters first, even though they have less luminance contrast than the black letters against the white background.
Here’s the thing though: there are a lot of black letters, and it gets to the point where your visual system can’t process which ones are important. Meanwhile, you notice the red and pink ones right away because they’re different.
Generally, we’ve found that the effect of luminance contrast is greater than the pop-out effect, but understanding both effects can help you determine the optimal color scheme. A good rule is to use a color that is high in luminance contrast but doesn’t appear frequently on the page. That means:
Take the easyJet website, for example:
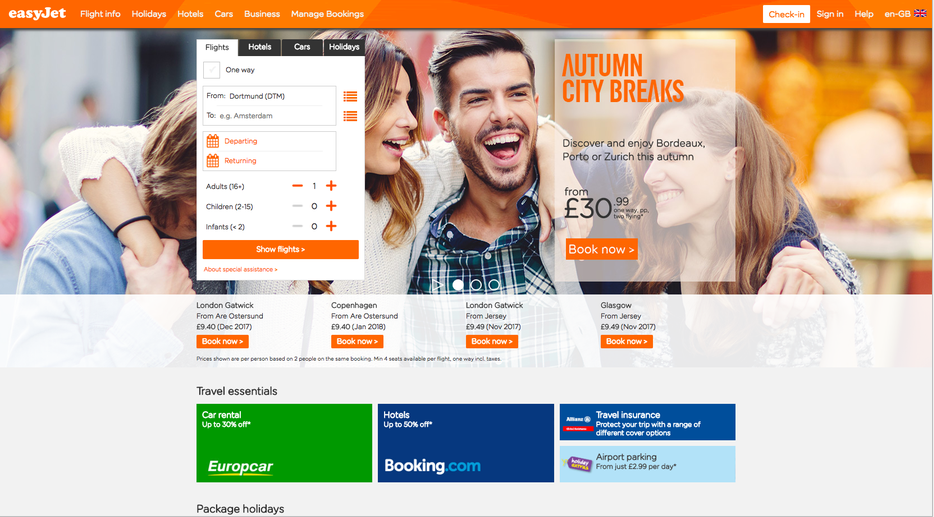
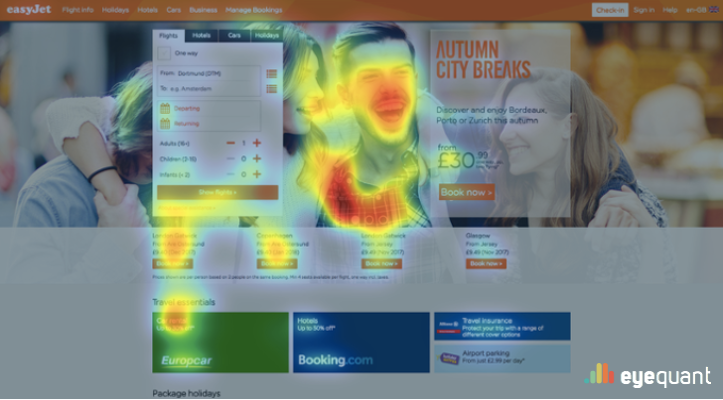
There are several call to action buttons on the screen, all of them a deep orange color. But several other elements on the page are also orange, so none of the buttons are particularly eye-catching. This is illustrated by the EyeQuant Attention Map for the page, which shows the areas of the design that are likely to be most and least eye-catching:
Here’s what could happen if they used a different color to leverage the pop-out effect – this time using green buttons instead:

Suddenly, those buttons stand out more, even though the luminance contrast hasn’t significantly increased. It’s not because there’s anything inherently special about the color green – any number of colors could work here. The important thing is that the color you choose isn’t used in too many other places in the design.
Hack #4: Center-Left Spatial Biases
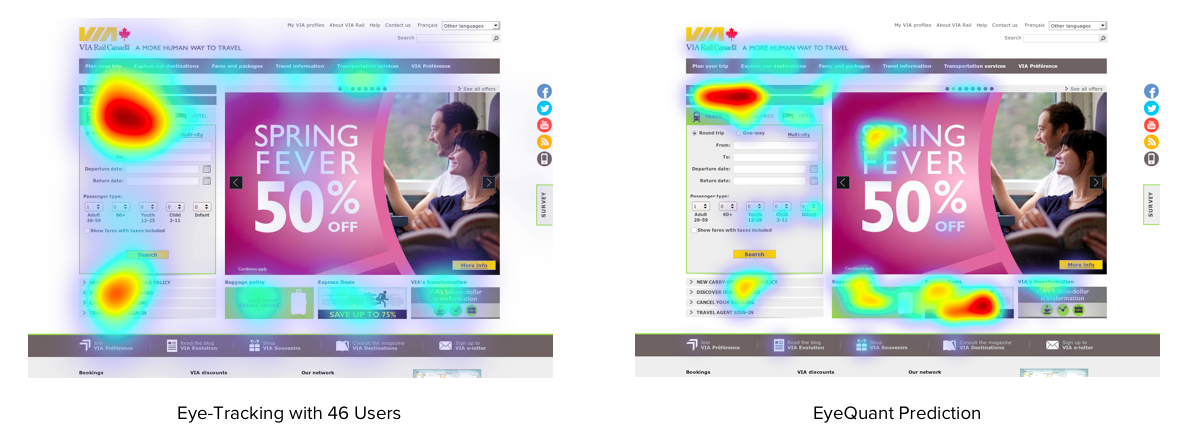
Many consultants claim that users scan/read pages in an F or Z-Shaped Pattern, but our data suggests those rules of thumb aren’t reliable. We analyzed scan-phase eye tracking data from 99 websites (each one viewed by 46 people), and here’s a heat map showing where they tended to look most:
![]()
As you can see, there’s a “blob-shaped” bias towards the center of the screen, and to the left. This bias is formed by years of experience in reading web content, but also books, newspapers, magazines, etc. Over time, people develop an intuitive sense of where the main content will start. Designers can use this knowledge to ensure that target content is placed in that high-value real estate.
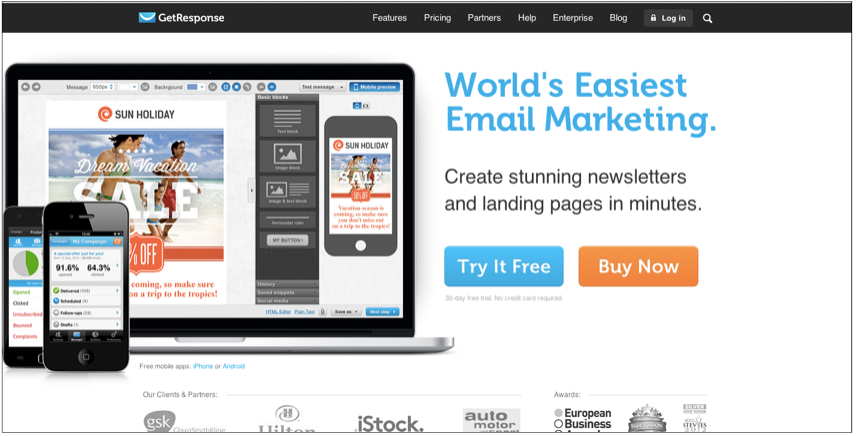
Here’s a quick example of a landing page design that places a picture at the top left of the page, with the more important content (the headline, value proposition and CTA) to the right. The spatial bias data we saw above would suggest that this isn’t an ideal layout.
This is confirmed by an EyeQuant Perception Map analysis, which simulates which content will be in direct sight (also called the foveal view) within the the first 3 seconds of their visit (roughly 10 eye movements):
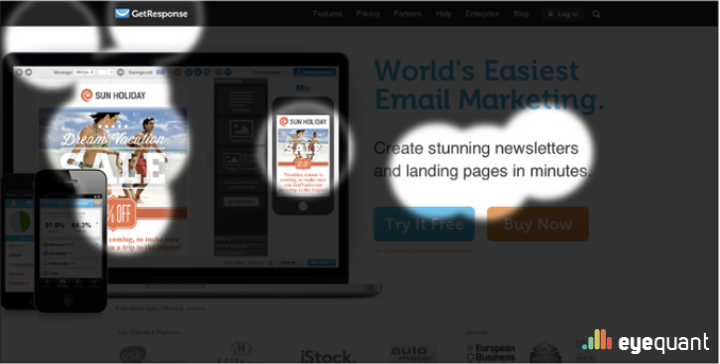
This map shows that users might not see the headline or call to action right away.
However, by simply moving the text to the left of the page, we can observe that it becomes much more visible, with users now seeing both the headline and CTA buttons within 3 seconds:
The same principle can be applied to many other types of pages. For example, almost all product detail pages in eCommerce place the product image at the top left. This makes a lot of sense in cases where the picture conveys the value proposition (i.e. fashion). But for other products where the image is less important, the classic template might be hurting sales.
Another important thing to note about positioning: make sure you cover the 3 Ws near the top of your page (“above the fold”) because 24% of the time users won’t scroll at all, and when they do scroll, they’ll only make it to the bottom of the page 22% of the time. The further from the top of the page your 3 Ws are placed, the less likely it is that people will notice.
Hack #5: Using Lines & Edges
Edge detection is an important part of how human vision works. Lines and contours serve as a critical visual cue, and any area on your website that has either many edges or particularly strong edges is likely to catch users’ eyes.
Edge density – the number of distinct edges in a visual scene – can be a very useful tool for guiding attention in design. The more edges in a specific region on the screen, the more noticeable that region will be.
That’s why text tends to stand out. But the concept of edge density also explains some other phenomenon. For example, we’ve seen in our eye tracking data that obnoxiously large headlines often don’t capture as much initial attention as expected. That’s likely because the number of edges per square inch/centimeter is drastically reduced when very large font sizes are used.
Here’s an example from eye tracking:
Notice how the banner text was largely ignored, despite the fact that the offer was highly relevant, and the fact that the text was very large.
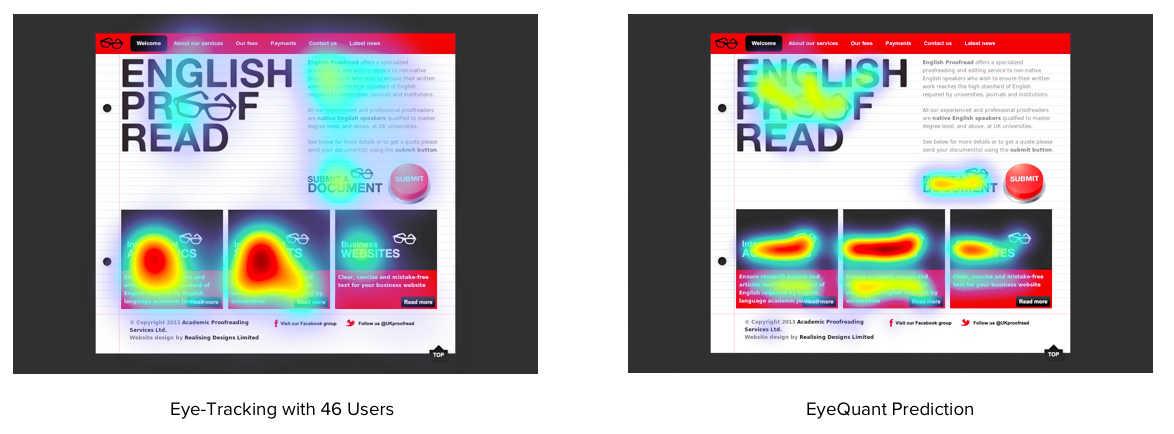
This isn’t simply a case of banner blindness, either. Here’s another example – this time it’s the headline that users aren’t seeing as much as you might expect:
So what are the lessons here?
First, you should avoid obnoxiously large text, but the data also suggests that if you want to increase the amount of attention going to your headline (or other text), you’re better off increasing font weight (boldness) than font size.
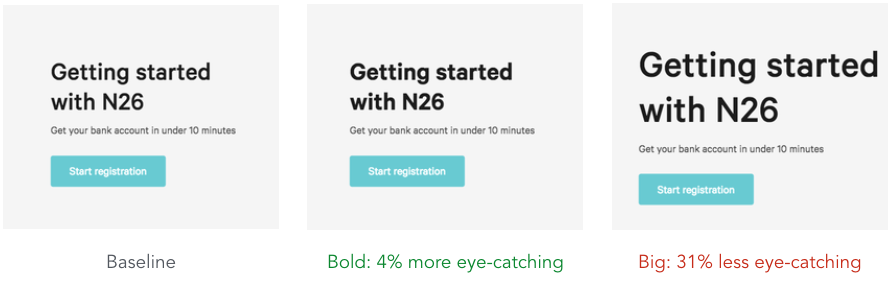
For example, here’s a very simple landing page that belongs to N26, a popular online bank:
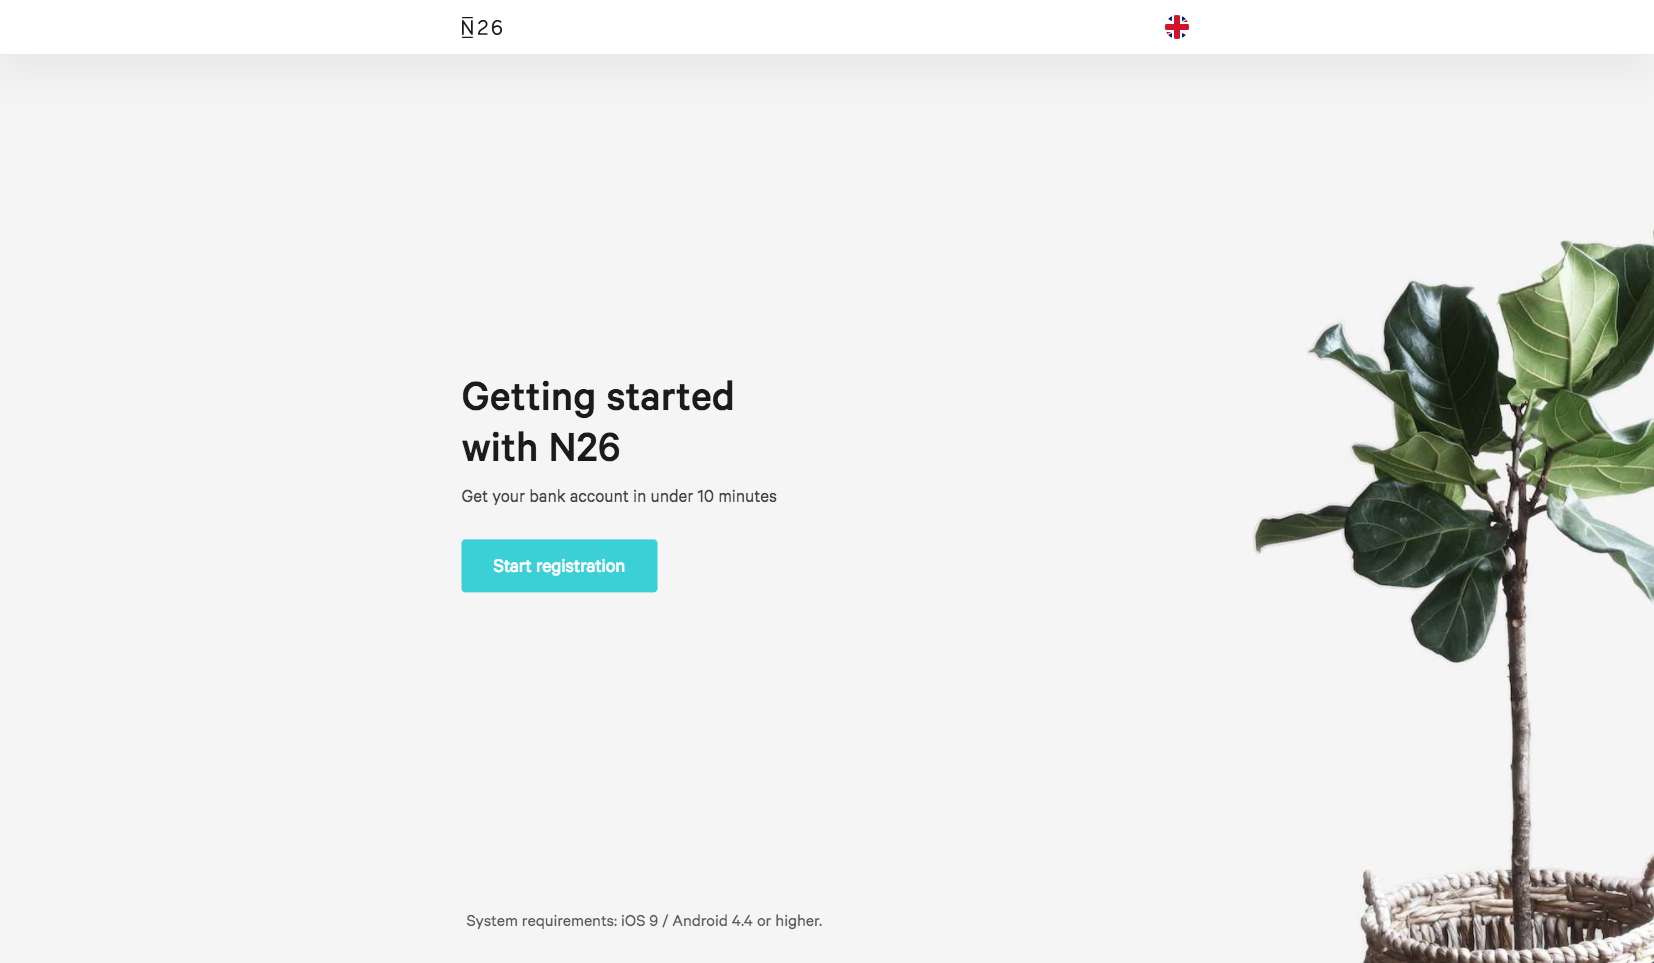
In this case, the headline is surely grabbing enough attention as-is, but just as an experiment, let’s take a look at what happens when we increase the font weight vs. increasing the font size. To do this, we’ll use EyeQuant’s Regions of Interest tool, which measures how eye-catching the content of a specific region is (relative to the rest of the screen).
When we increase the size of the headline by 50%, the headline area was predicted to be 31% less visible than the baseline version. Meanwhile, when we instead increased font weight by 50% (leaving the original font size in tact), it caused a 4% increase in headline visibility.
You should also consider edge density when selecting imagery. Images containing areas of high image density are more likely to distract users. Be careful with images that contain patterns or high-density backgrounds (trees, grass, rows of windows, etc).
For example, here’s a design from Adidas that includes a distracting background image:
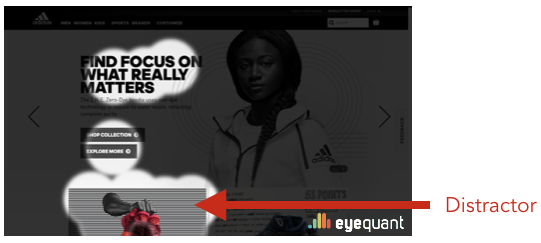
The EyeQuant perception map indicates that users are looking at the image background before other, more important content like the sub-header.
These 5 attention hacks should be a sufficient toolkit for you to scientifically engineer your designs to direct users’ eyes towards exactly the content you want them to see.
However, to confirm whether or not your design is having the desired effect, you need to actually measure initial attention. This can be done using eye tracking studies, or with the EyeQuant visual hierarchy analysis we’ve used several times throughout this guide.
Finally, beware of the many myths about what draws attention. For example, we covered a few common misconceptions about attention in our article about the 3 most surprising insights from a 200-website eye tracking study.

Why do users miss what seems obvious? In our latest webinar, Professor Peter König, one of the world’s leading...
Read more
In this session, we explored how teams can move beyond instinct and start making creative decisions based on how...
Read more
What does attention prediction actually look like in day-to-day design work? In this month’s webinar, we’re joined by leading...
Read more